All Point of Sale transactions, sales and returns, are entered through Orders. To begin a new order select the  button to choose a customer account or select the
  for an order to the anonymous customer or use the Enter key. See Order Entry Navigation to learn about the functions at the top of the window. After Items are added to the order and the order is saved, all fields at the top of the order become active.
| Access |
| Grant permission to User Profiles in Access User Profiles > select a User Profile > Security > Orders > Main Menu > Access Open Orders |
| Grant additional permission to User Profiles > Orders > Enter Freight Information |
| Grant additional permission to User Profiles > Orders > Pricing Date Change |
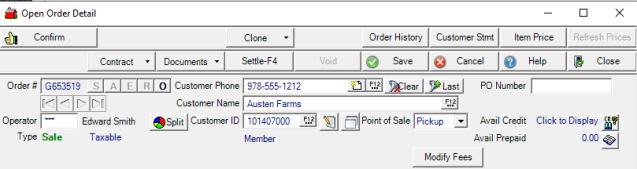
Order # - Unique system generated Order number assigned after creating a new order. To create a new order, select
- S - New Sale order or F2 to create a new Order
- A - New Sale order or F3 to create an order for an Anonymous Customer
- E - Exchange- Processes the return and sale of items with one transaction. This option is best used when the exchange transaction will result in the customer owing an additional amount or the value of the return and sale match. For transactions where the amount of the items returned exceed those purchased, separate Return and Sale transactions should be used.
- R - Return - Return of an item. A Manager Approval password can be required for Return transactions if enable in Merchant Ag FIN > Access Parameters. See Return Orders for details.
- O - Select to access Open orders that have been Saved. See Select an Open Order for more details.
- or select Enter.
Operator is a required field. Enter the Operator number of who is entering the order.
 When processing a Return, if the order was settled with a Prepaid, a checkbox "Return to Prepaid" will appear under the signature box.
Add a Customer
Search customer records by entering a Customer Phone number.
Enter the Customer Name or select F12 to Search.
Customer ID - Enter the Customer ID or select F12 to Search. Customers with Delayed Terms available on their accounts can quickly be identified by the new Delayed Terms flag that appears after selecting the account.
Use  in any field to search for a customer account
![]() the selected Customer.
the selected Customer.
Select  to retrieve the Last Customer selected.
Click  to add a new Customer account. See Add Order Entry Customer for details.
Use  to edit a customer account. See Edit a Customer for more information on editing a customer.
Click  to open Customer detail to access the full customer account.
Use the View Customer Detail button to review the customer account selected for the order.
Enter a PO Number of 15 alpha-numeric characters which may be required for the order.
If the customer is participating, the Loyalty Card number will be displayed. See Customer Detail Loyalty for more information.
 displays the available credit extended to the customer. Double click to view the account information includes current and previous month balances, last payment date and amount.
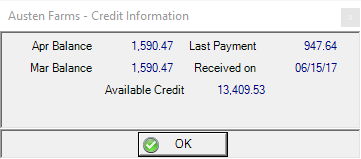
If enabled in Merchant Ag FIN > Access Parameters, the Customer credit Limit can also be included.
The Avail Prepaid fields displays the available amount of Prepaid for the customer. Learn how to Settle to Prepaid here.
If available, Orders can be settled to JDF. Use  by selecting the drop down menu available and choose
- Authorize to Authorize settling the transaction to JDF.
- Customer Status to retrieve up-to-date information on a JDF Multi-plan which includes
-
- Available Credit
- Credit Limit
- Restricted Status- If "Y" is indicated, sales to the JDF account are currently restricted.
![]() is visible if enabled in Merchant Ag FIN > Access Parameters to add third party Freight to an Order. See How to Add Third Party Freight for more details.
is visible if enabled in Merchant Ag FIN > Access Parameters to add third party Freight to an Order. See How to Add Third Party Freight for more details.
Select Modify Fees to allow any fee amounts, such as pass through tonnage tax, to be modified or removed prior to settling the order.
Create a Split Order  for an unlimited number of customers and utilize a predefined Customer Split, select a predefined Split and add Customers as needed or create a new Split. Click
  to choose a predefined Split. See Create a Customer Split in Order Entry for details on the modifications available when creating a Split Order. See Customer Detail Splits for information on predefined Customer Splits or see Access Split Orders for more information on Split Orders.
Learn about referencing multiple Bookings on Split Orders here.
Body Section
This section is used to add items and services to the order. Learn more about the icons in the Body section here.
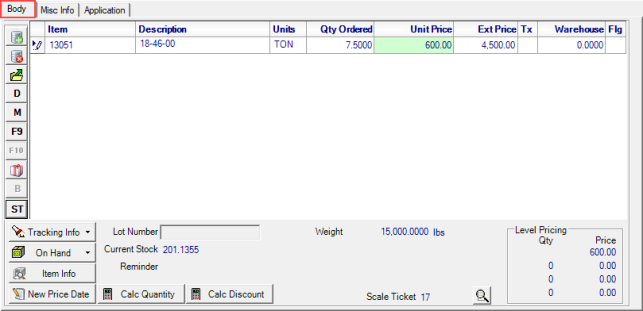
Item - Enter Items on an Order by scanning the item, keying the Item ID or enter a keyword in the Item field to search. Use F12 to access the Item Filter to search for Items.
Once an Item ID has been selected the item Description populates automatically.
The items stocking Unit of measure also defaults automatically.
In Qty Ordered enter the quantity of the item or if the item is scanned repeatedly, the Qty Ordered will be counted. If an item has a Sales Entry Unit of Measure, right click to access the Sales Entry Units dialog and enter the alternate quantity. See Item Detail for more information. If entering an Exchange transaction, when processing the Return portion of the transaction, enter the Qty Ordered as a negative number. If scanning Items, select the F10 and scan all items being returned then select F10 again when entering Items sold.
Unit Price of the item. Unit Prices highlighted in green can be updated. Click into the field and enter the new price and for items with Tier Pricing, select the drop down menu to select an alternate Tier. For more information on Tier Pricing or Tier Discounts, see Item Detail.
The Ext. Price is calculated by using the Unit Price multiplied by Quantity Ordered.
Tx indicates the level of tax associated with the item for the Customer. Tax will be calculated automatically but can be edited by right clicking in the Tax column. Select High Rate, Low Rate or Non-Taxable as applicable.
The Warehouse column indicates the quantity that will print on the pick ticket which can be modified for items that are normally stocked in the warehouse and do not need to print on the pick ticket.
Flg - Flag - Items may be flagged for additional information regarding the item.
- RC - Restricted Chemical, current Chemical license required for purchase.
- LN - Lot Number required
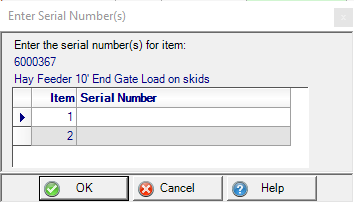
- SN - Serial Number required. After the item quantity is entered, the Enter Serial Number window appears.
- OS - Out of Stock
- BT - Bayer Technical license required for purchase
- DT - Dow Technical license required for purchase
- MT - Monsanto Technical license required for purchase
- NT - Syngenta Technical license required for purchase
- PT - Pioneer Technical license required for purchase
- CT - Clearfield Technical license required for purchase
- VF - Veterinary Feed Directive required for purchase
See the Adding Items to Orders section on Order Entry Navigation to learn more about the available icons.
For items flagged as SN, opt to enter the Serial numbers for the item before settling the order.
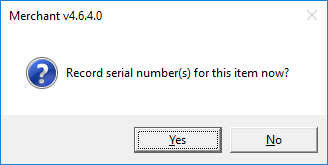
Select Yes to access Enter Serial Number(s). Select OK when complete.
Items flagged with LN will require Lot Numbers. Click into  and enter the Lot number for the Item for items with Sales set in Lot Tracking.
For items set for Full Lot tracking, when Settle is selected, use the Lot Tracking for Order window to select the lot number associated with the item.
![]()
Current Stock indicates the current stock level of the item for the site. This is the item On Hand quantity minus any quantity committed through site transfers, layaway or open orders.
Reminder displays any sales reminder that's been set for this item. See Item Detail for more information.
Weight will display the selected items total weight for the order.
Customer Price Level is the Level price assigned to the selected customer for locations using pricing tiers.
 provides a net available quantity of an Item for each location. Learn more here.
 - Use this option to select a new Price for a selected item based on date. When the new Pricing Date Change opens, enter a new date using the mm/dd/yy format or select from the drop down calendar. The new price will be based on Price History found in Item detail.
 will calculate the Quantity for fuel items only by entering the Extended Amount.
Use  to apply a Unit Price Discount to line items. Learn more here.
The ID of any Scale Ticket applied to the Order will appear. Click  to access View Scale Ticket Information to view the Scale Ticket ID, Vehicle ID, Vehicle Reference and any Comment.

If Level Pricing information has been set for the selected item, the information displays in this section.
Body Footer
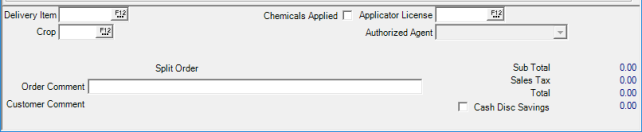
Enter the Delivery Item ID or select F12 to search which works in conjunction with  in the left margin to assess delivery charges on an item. The delivery charge is added to the Unit Price on the item and does not print on the sales invoices as a separate line item.
If needed enter the Crop ID or select F12 to search.
Click the Chemicals Applied checkbox if chemicals will be applied for the customer. Once selected, the Applicator License field becomes active.
When active, use the Applicator License field to select or enter the applicator license of who will perform the chemical application. Select F12 to search for an Applicator and utilize the Sort by: pull down menu and choose an option to refine the search.
- ID
- Name
- State
- License
- Expiration
See Access Applicators for more information.
Split Order will displays the parent order number for the Split Order.
Order Comment is a 70 character alpha-numeric field that prints on the Sales invoice.
Customer Comment displays the contents of the Customer Comment field found on the AR Customer account.
Sub Total is the total of the Items section.
Sales Tax displays the calculated sales tax on applicable items based on the selection in the Tx field in the Body item grid.
Total is the Total of Sub Total and Sales tax.
Select Cash Disc Savings if items are flagged for a discount when settling with a cash tender.
Misc Info
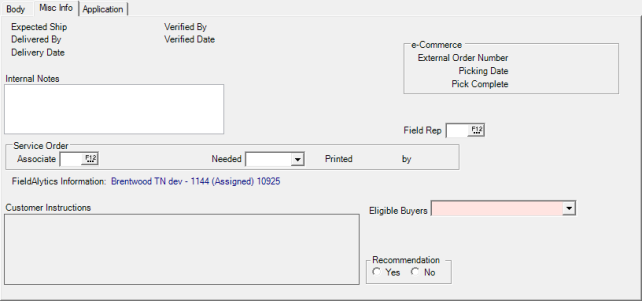
The Expected Ship and Delivery Date fields will be populated when locations set dates using Order Dispatching. See Access Dispatching for more details.
Enter up to 70 alpha-numeric characters in the Internal Notes field.
 Use the new e-Commerce section to view
-
External Order Number
-
Picking Date
-
Pick Complete
Select a Field Rep for the Order by entering the ID or use F12 to search.
Service Order
In the Associate field, enter the Operator ID or select F12 to search.
Select Needed from the drop down menu or enter a date the service order is needed.
Use the Eligible Buyers drop down list to choose a Buyer for the Order which will populate the Eligible Buyers field on the Settle screen.
For Locations that requirement acknowledgment that a Recommendation was provided, click either Yes or No. The selection will print on all customer documents.
Printed is the date the Service order form located in the Documents button at the top of the order is printed.
by displays the Date and Operator number of when and who printed the Service Order.
Learn about the new Application tab here.